Guide
Contents: Getting Started | Run the Accessibility Check | Remediation Workflow | Auto Tag | Reading Order | Set the Document Language | Set the Document Title | Decorative Text vs. Alt Text | Add Alt Text | Check Lists | Check Tables | Check Hyperlinks | Verify Header Order is Sequential | Final Verification and Saving | Run the Accessibility Check Again | Save the File
Getting Started
- Open your PDF in Adobe Acrobat Pro (the free Reader version does not have these capabilities).
- Go to the menu bar on the side of the screen and select
Prepare for Accessibility
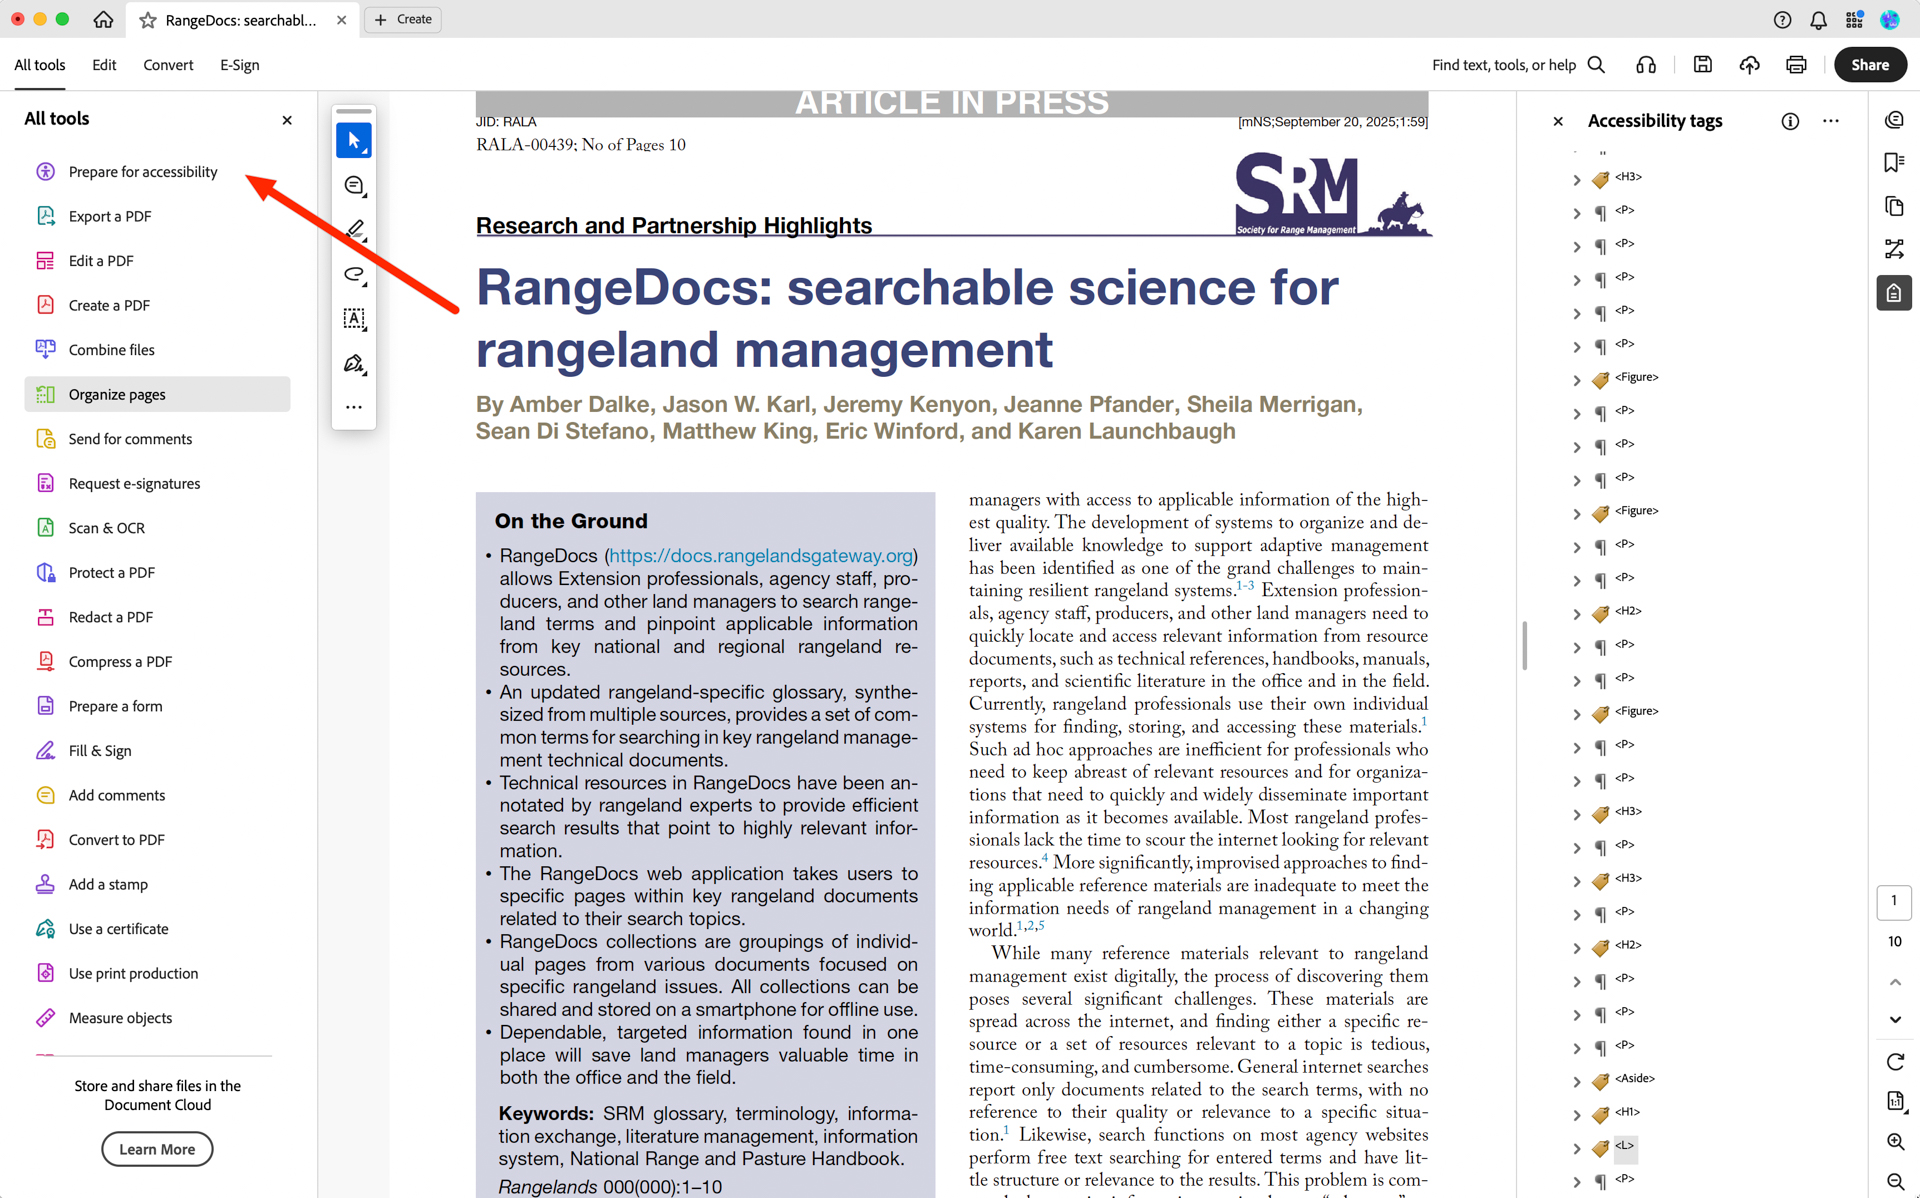
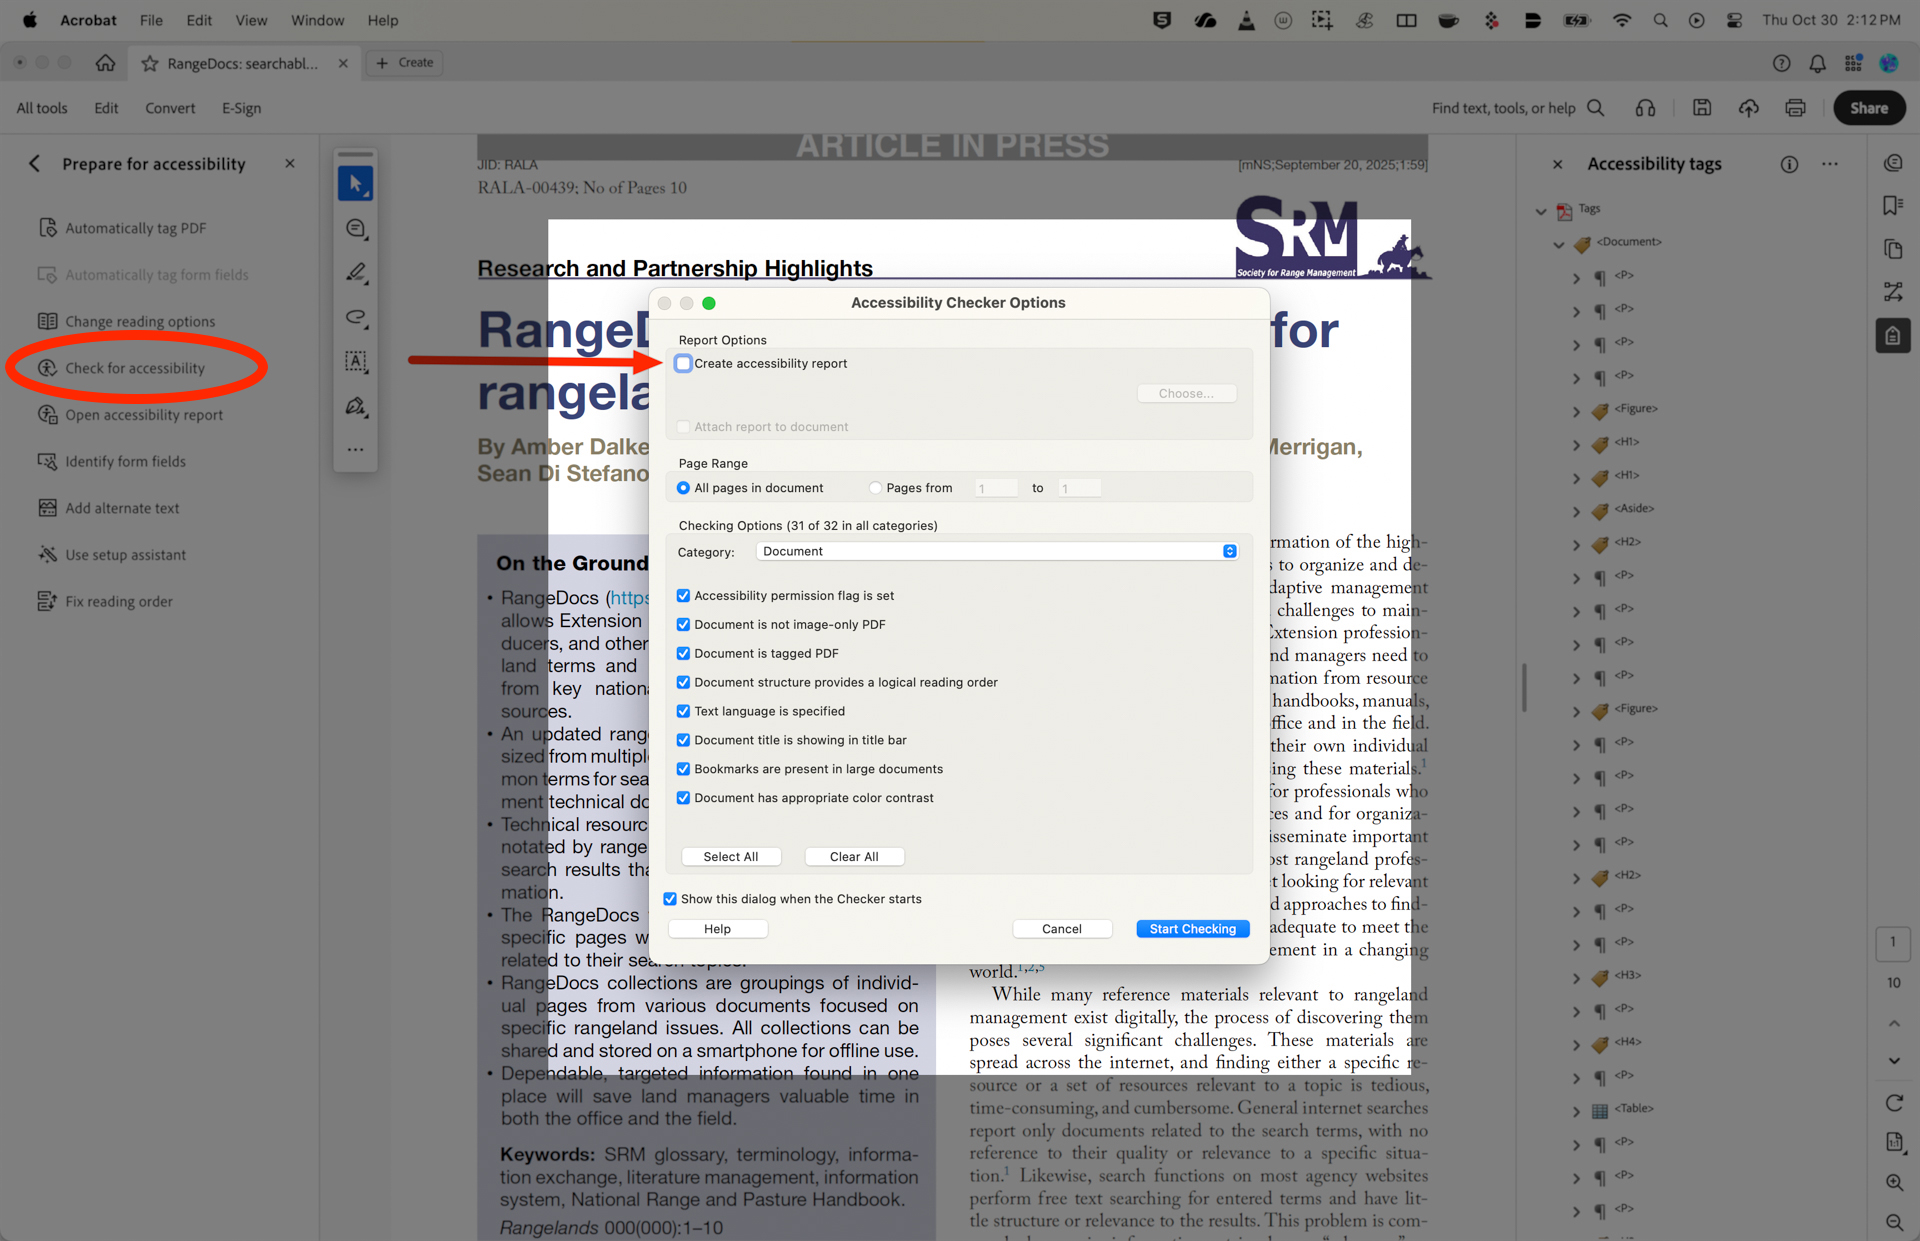
Run the Accessibility Check
This is your starting point. The checker will scan the document and generate a report of errors, warnings, and tips.
- In the
Prepare for Accessibilitypanel on the left, selectCheck for Accessibility - It gives you the option to save reports, but they are relatively quick to generate and you will be running it more than once, so I would uncheck this box
- Select
Start Checkingand results will generate on the right panel
Remediation Workflow
If your check generated some failures (represented by a red x mark in the accessibility panel), the most frequent culprits will be the lack of a tagging structure and lack of alt text for images within the document.
The tagging structure informs your PDF reader application how a document is meant to be read and in what order. Alt text is a short, simple description of the contents of an image. While a caption below an image describes what is not visible, such as the names of the people, the location and date of the image, alt text describes only what is visible.
Here is an example of alt text for this image:

“A large, snow capped mountain seen from across a grassy valley and immediately behind a conifer tree limb.”
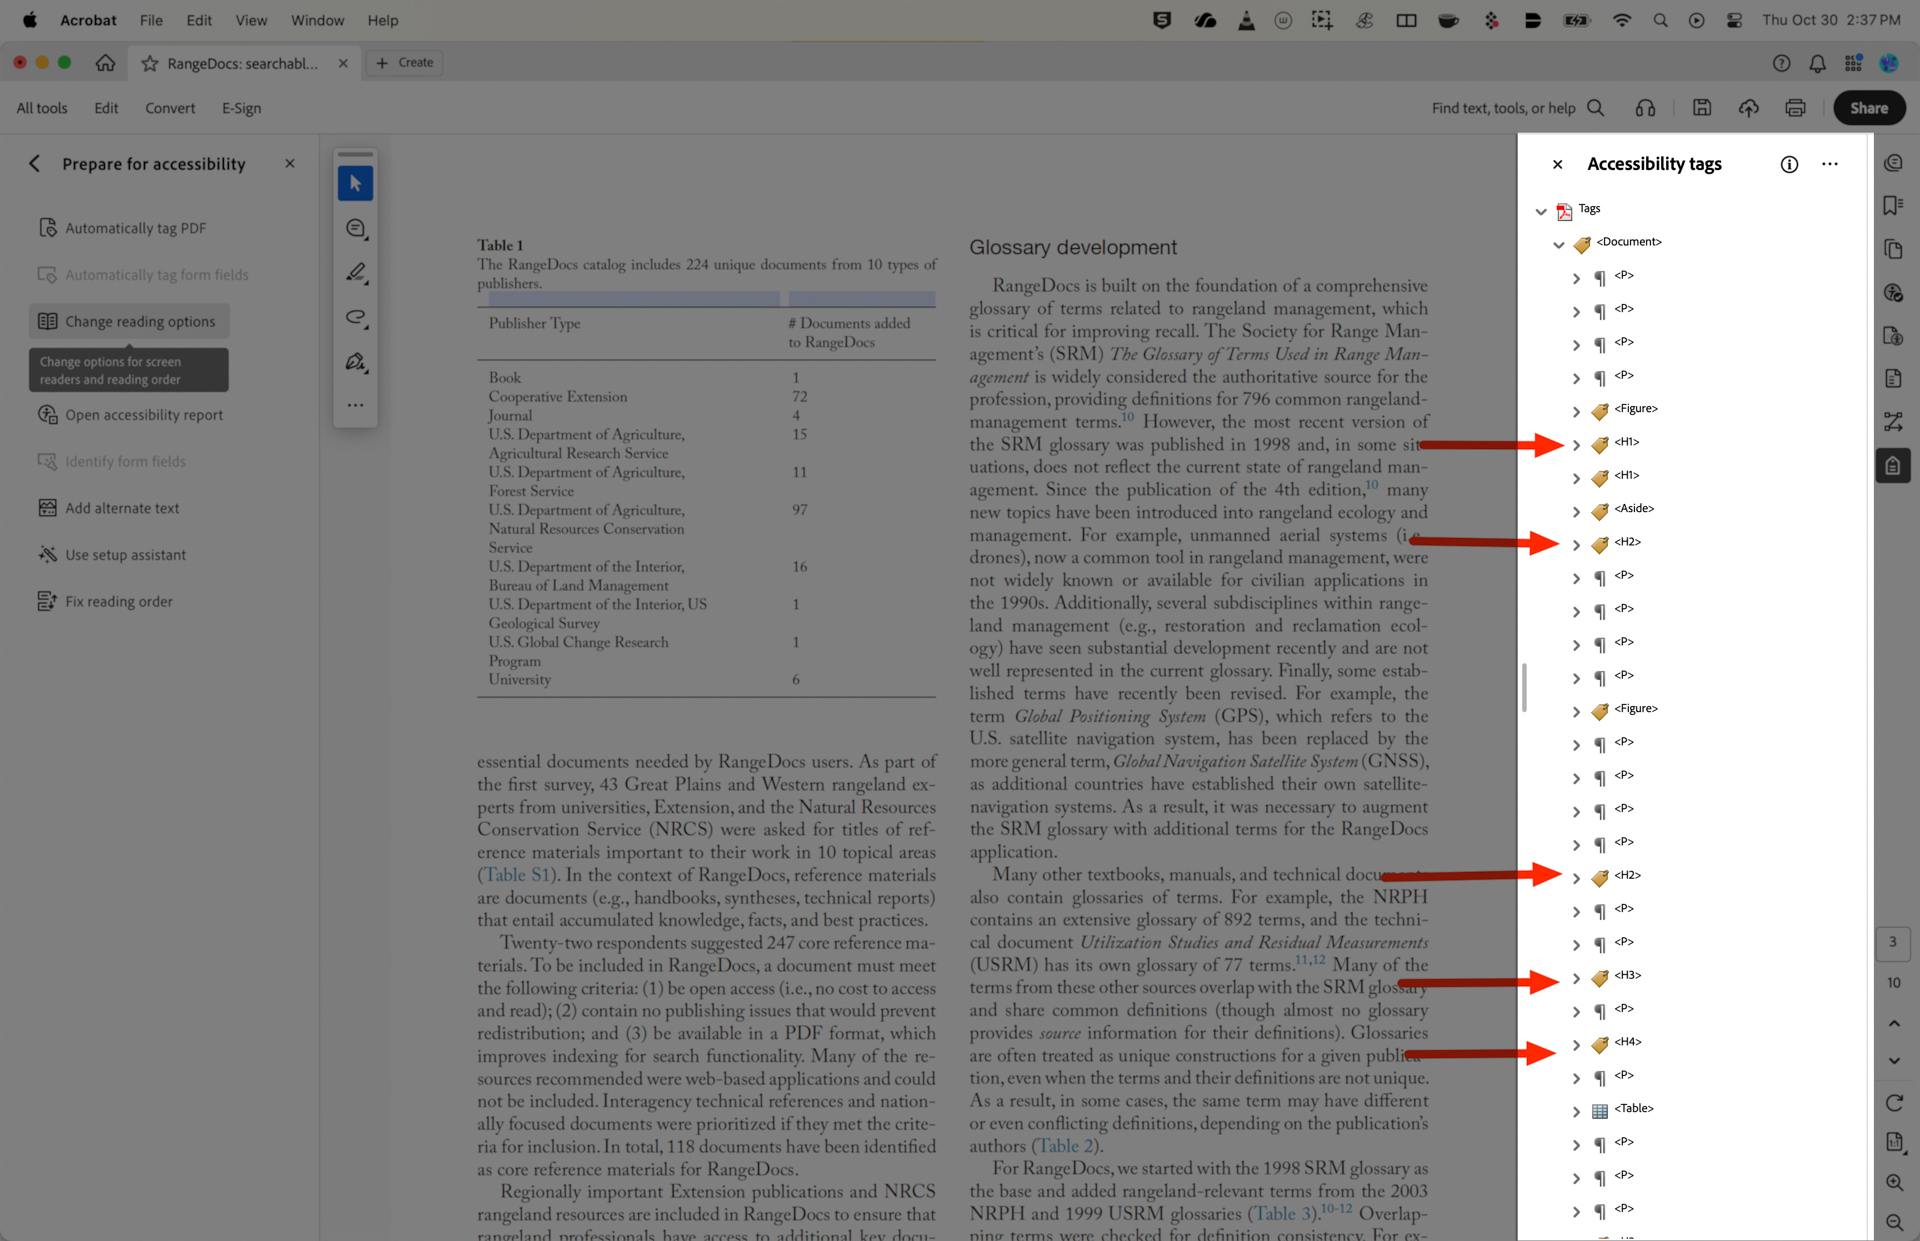
Auto Tag
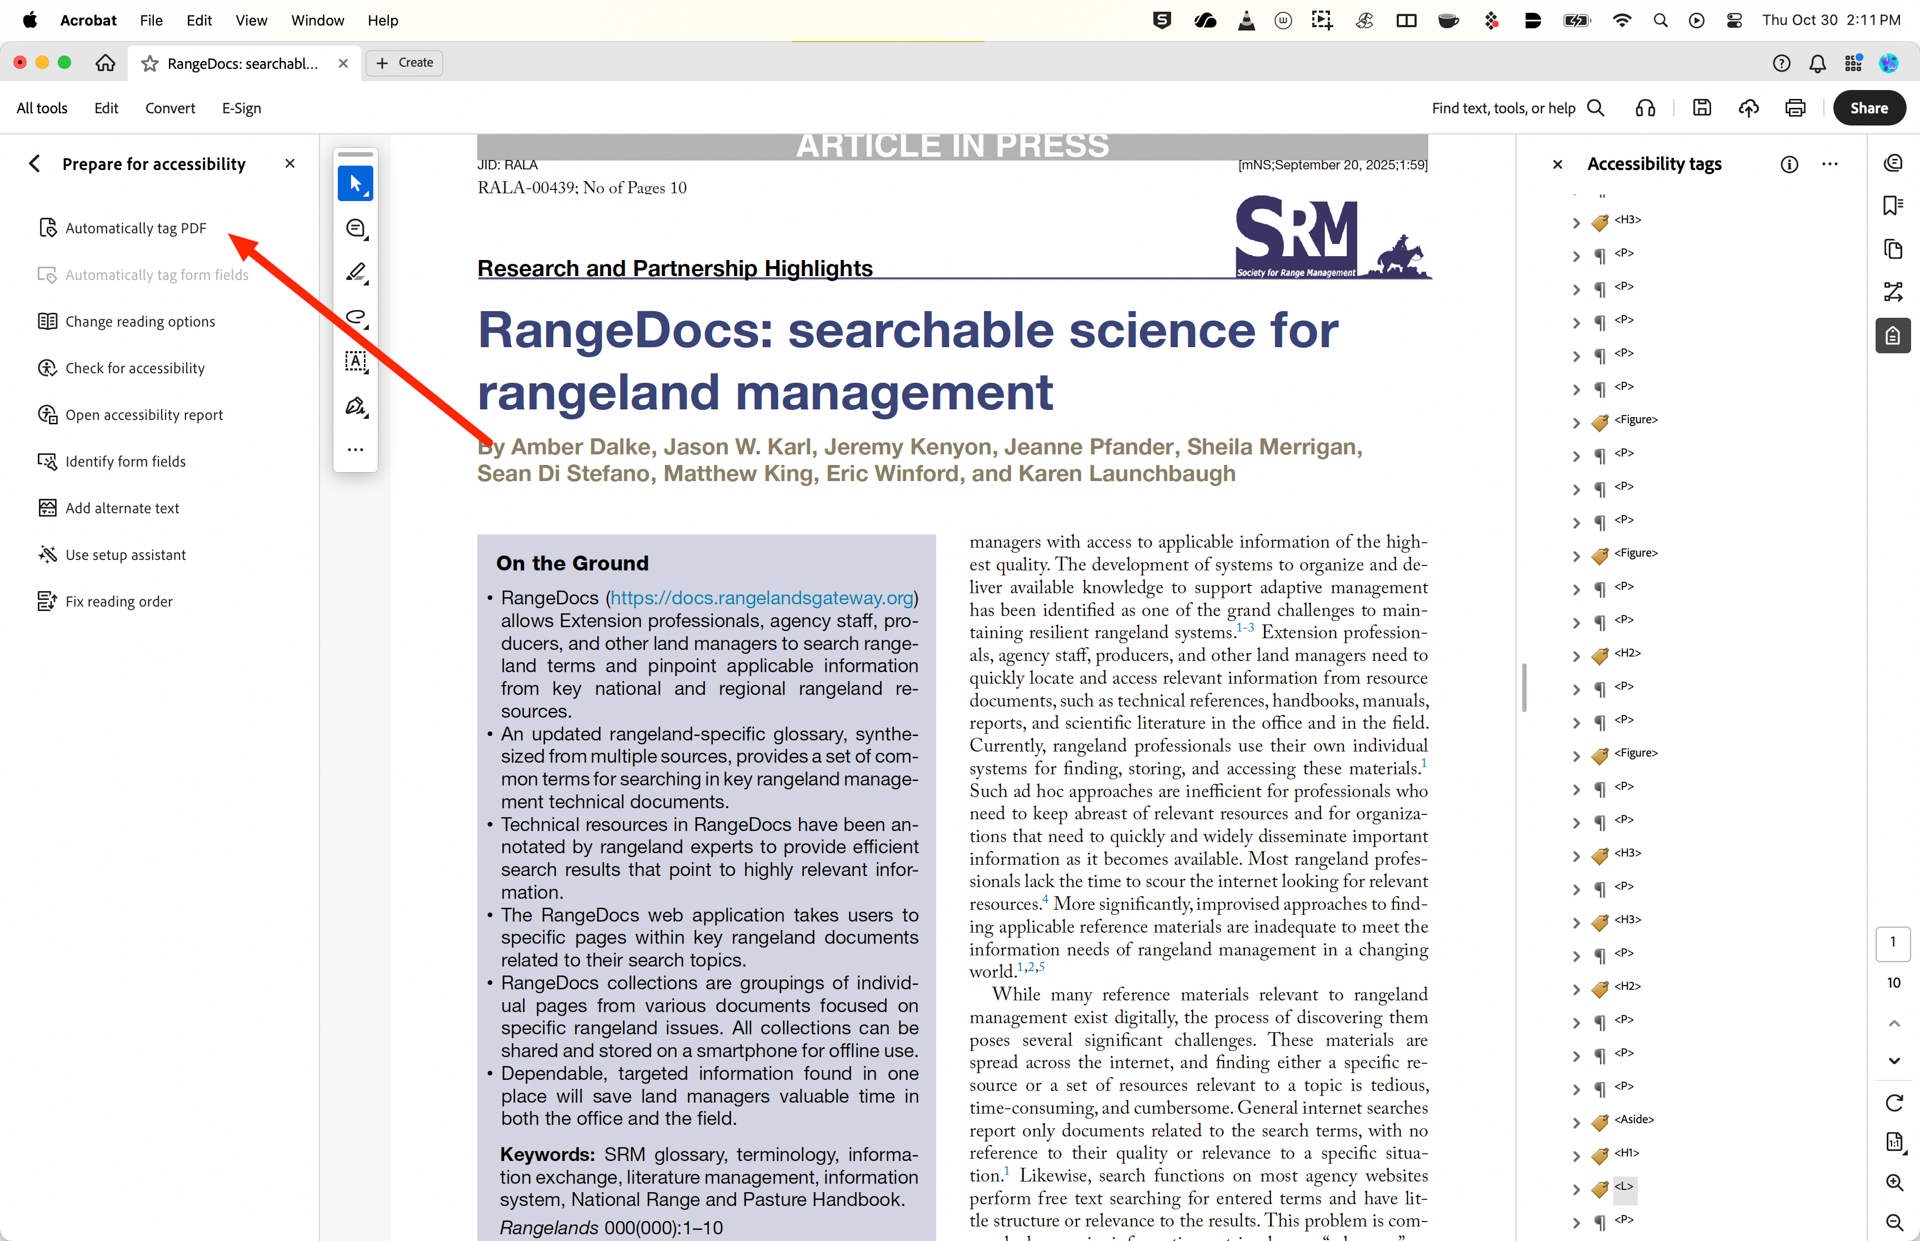
- In the
Prepare for Accessibilitytools panel, clickAutomatically Tag PDF. After this runs (takes about 1-5 minutes), it will display Accessibility tags, displaying the order of items as they display on the page.
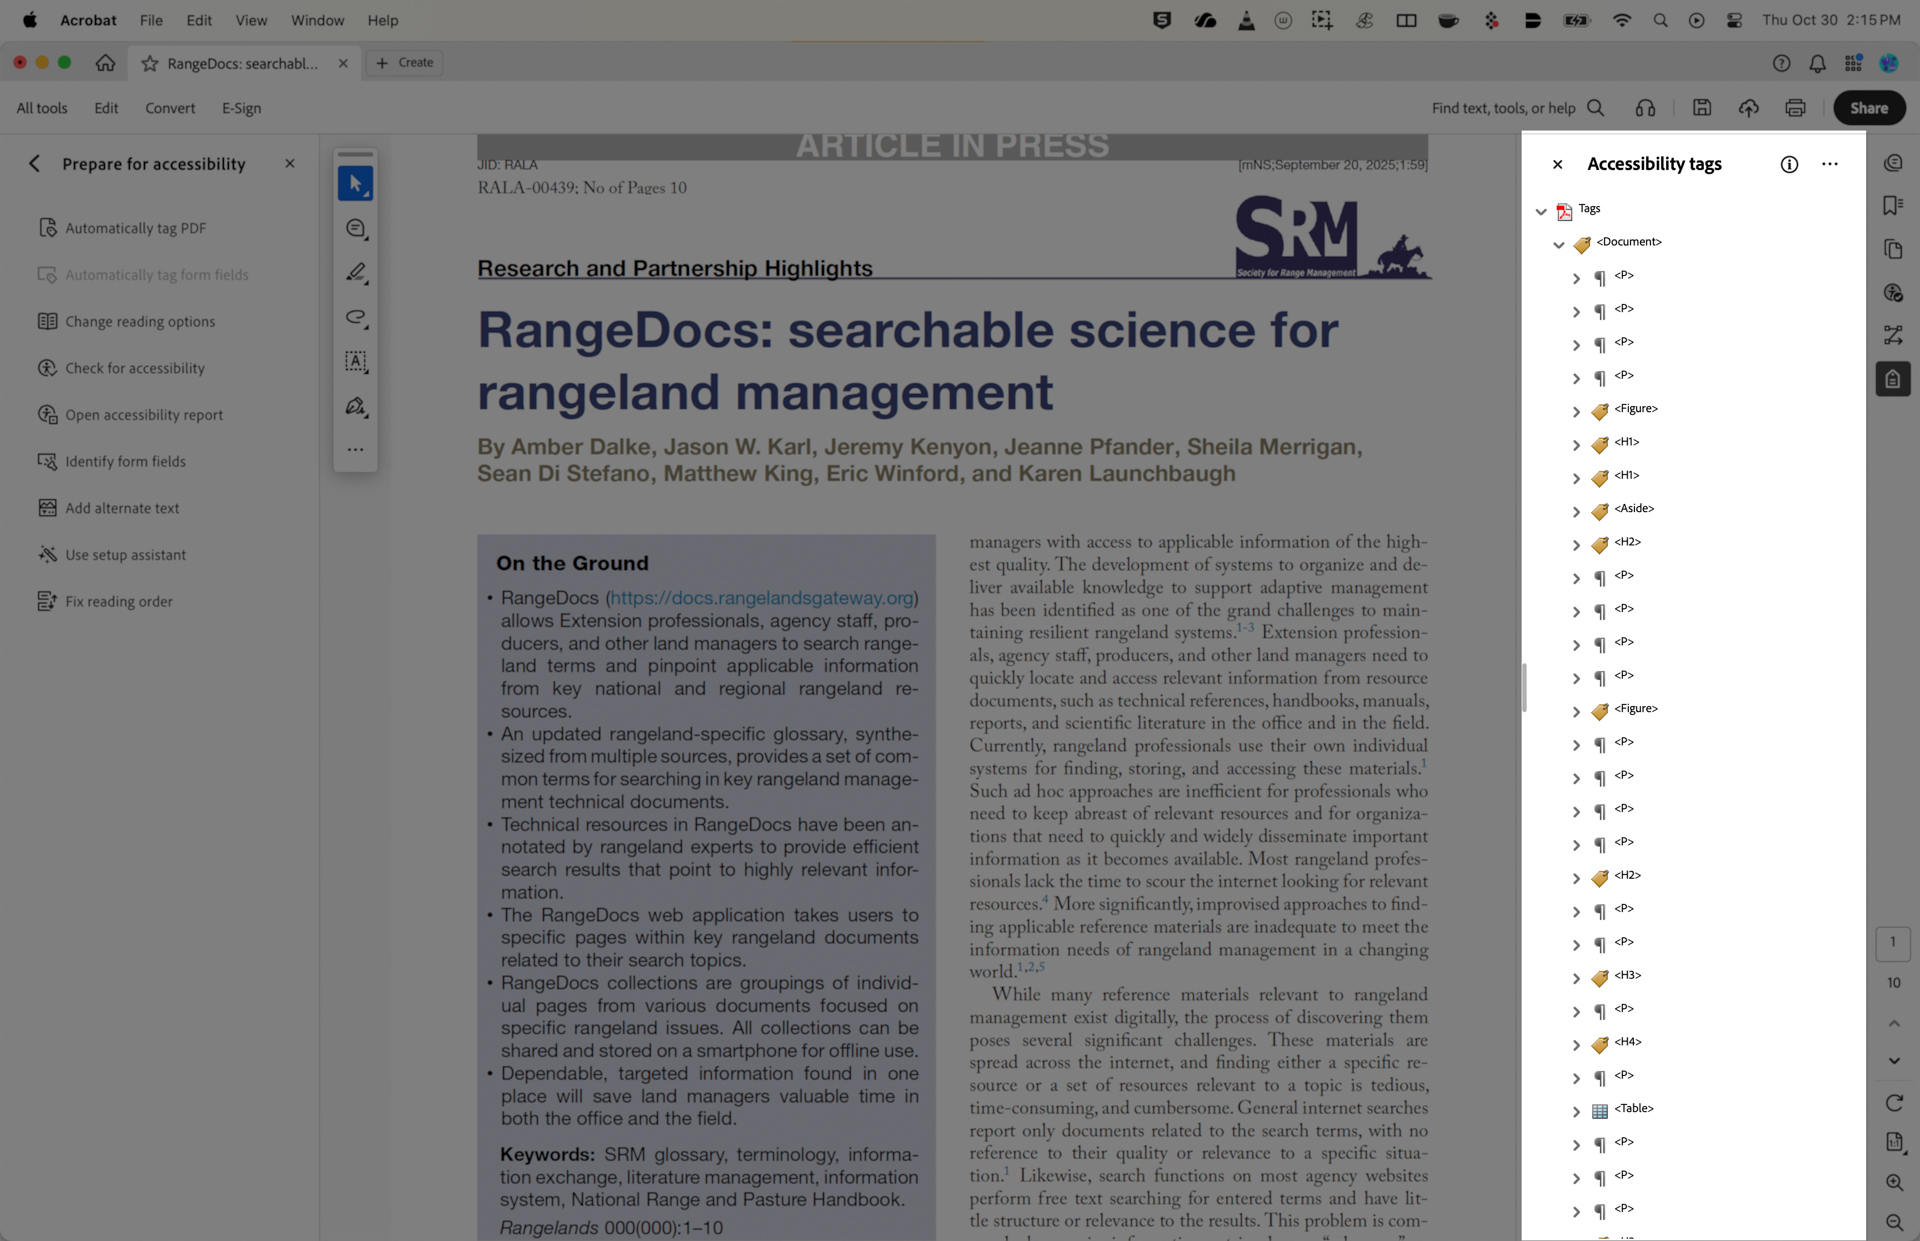
Note: the easiest way to navigate and expand the tag field is using your arrow keys. Up and down goes directionally through the tags and left and right expands or collapses content.
- It would be great if you could search through the tags and filter according to type so you could look at say, just your figures, tables or lists that are frequently the culprits of accessibility issues, but selecting the ellipses on the Accessibility Tags panel and selecting Find looks instead for an obscure set of terms…
The next three steps should have been completed by the Auto Tag process, but just in case…
Reading Order
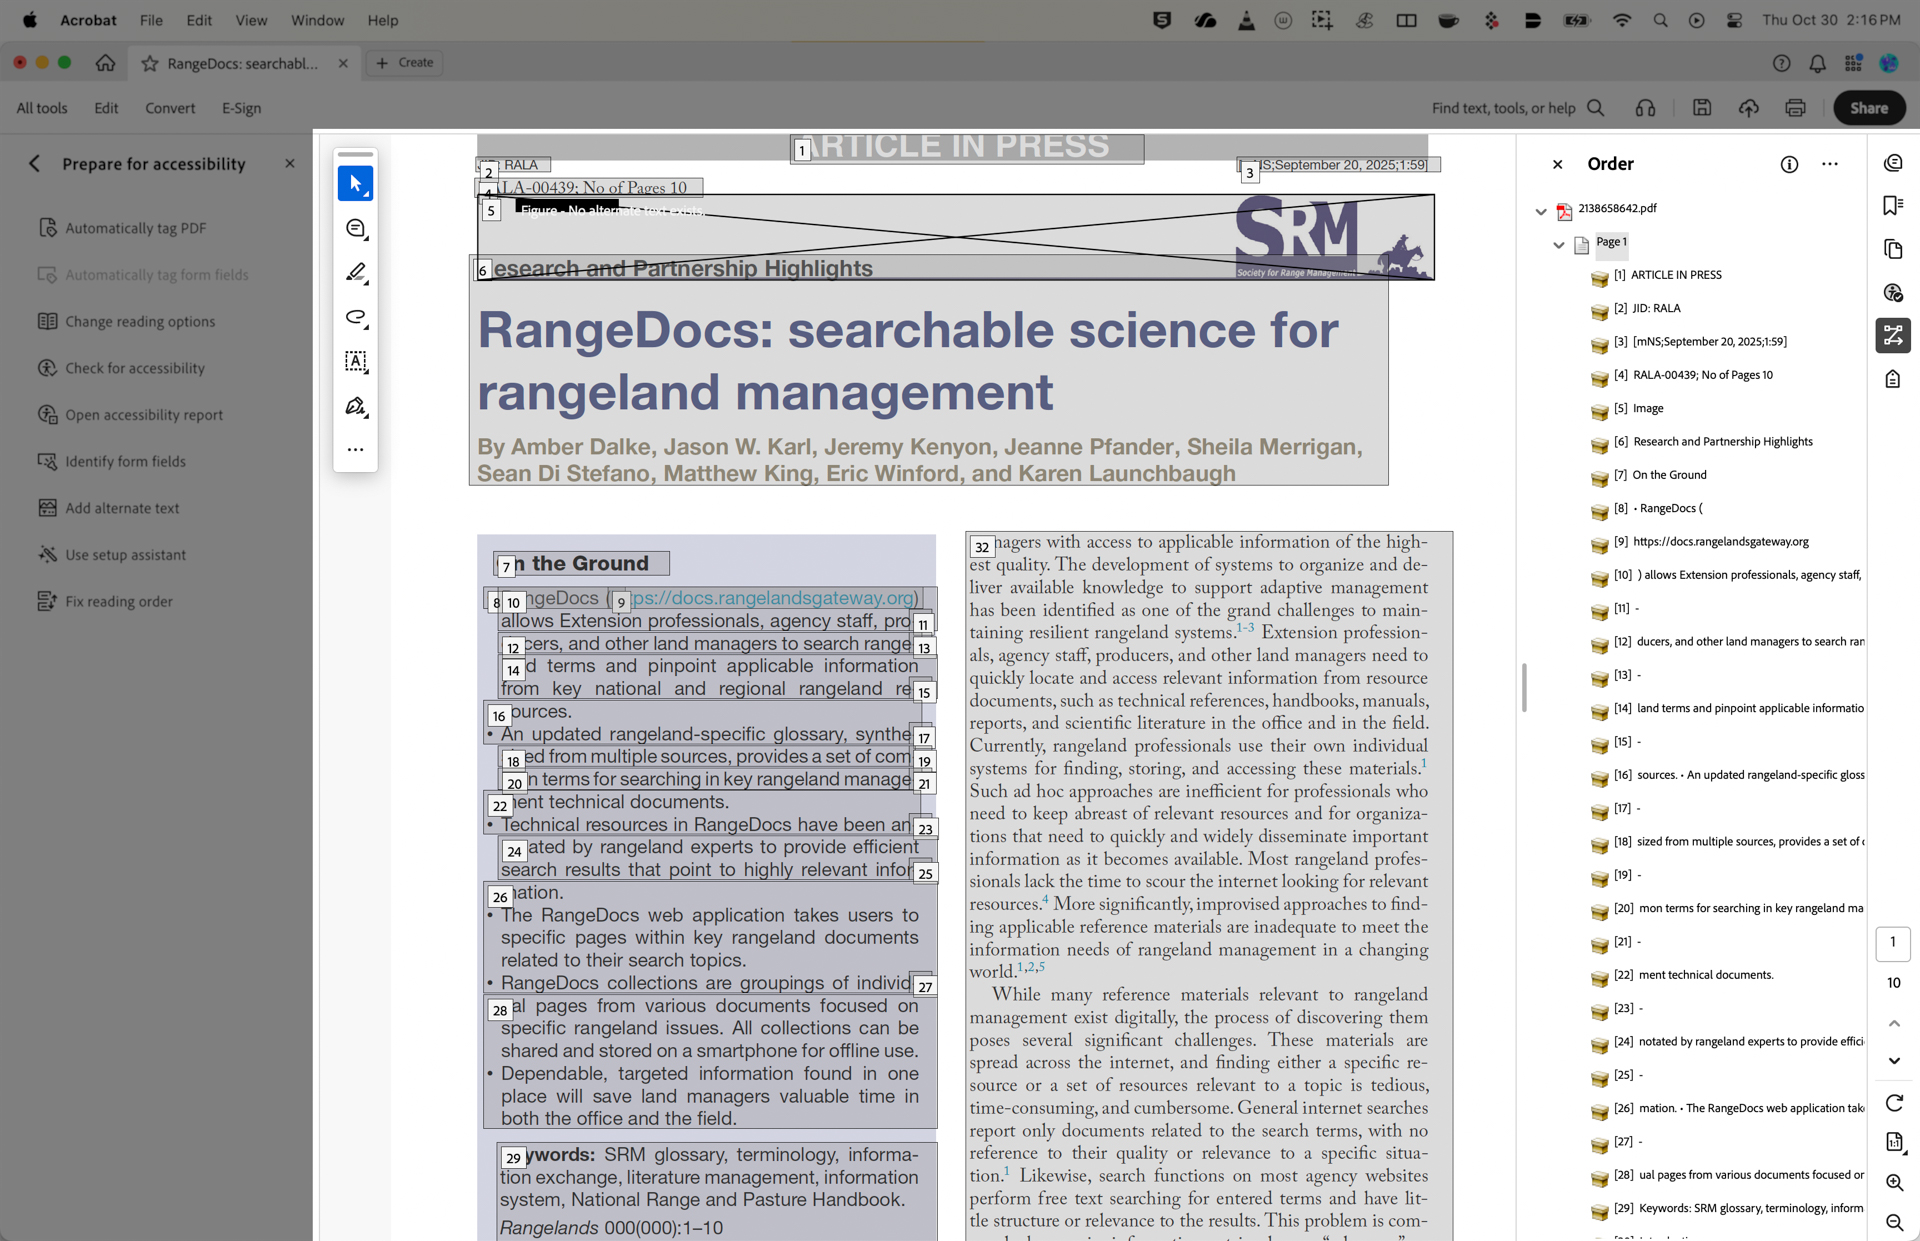
- If anything needs correcting, select the
Fix Reading Ordertool on the left panel. This will open a window. SelectShow Reading Order, which will open on the right pane with all of the sections. Drag the section’s box icon up or down to reorder as needed.
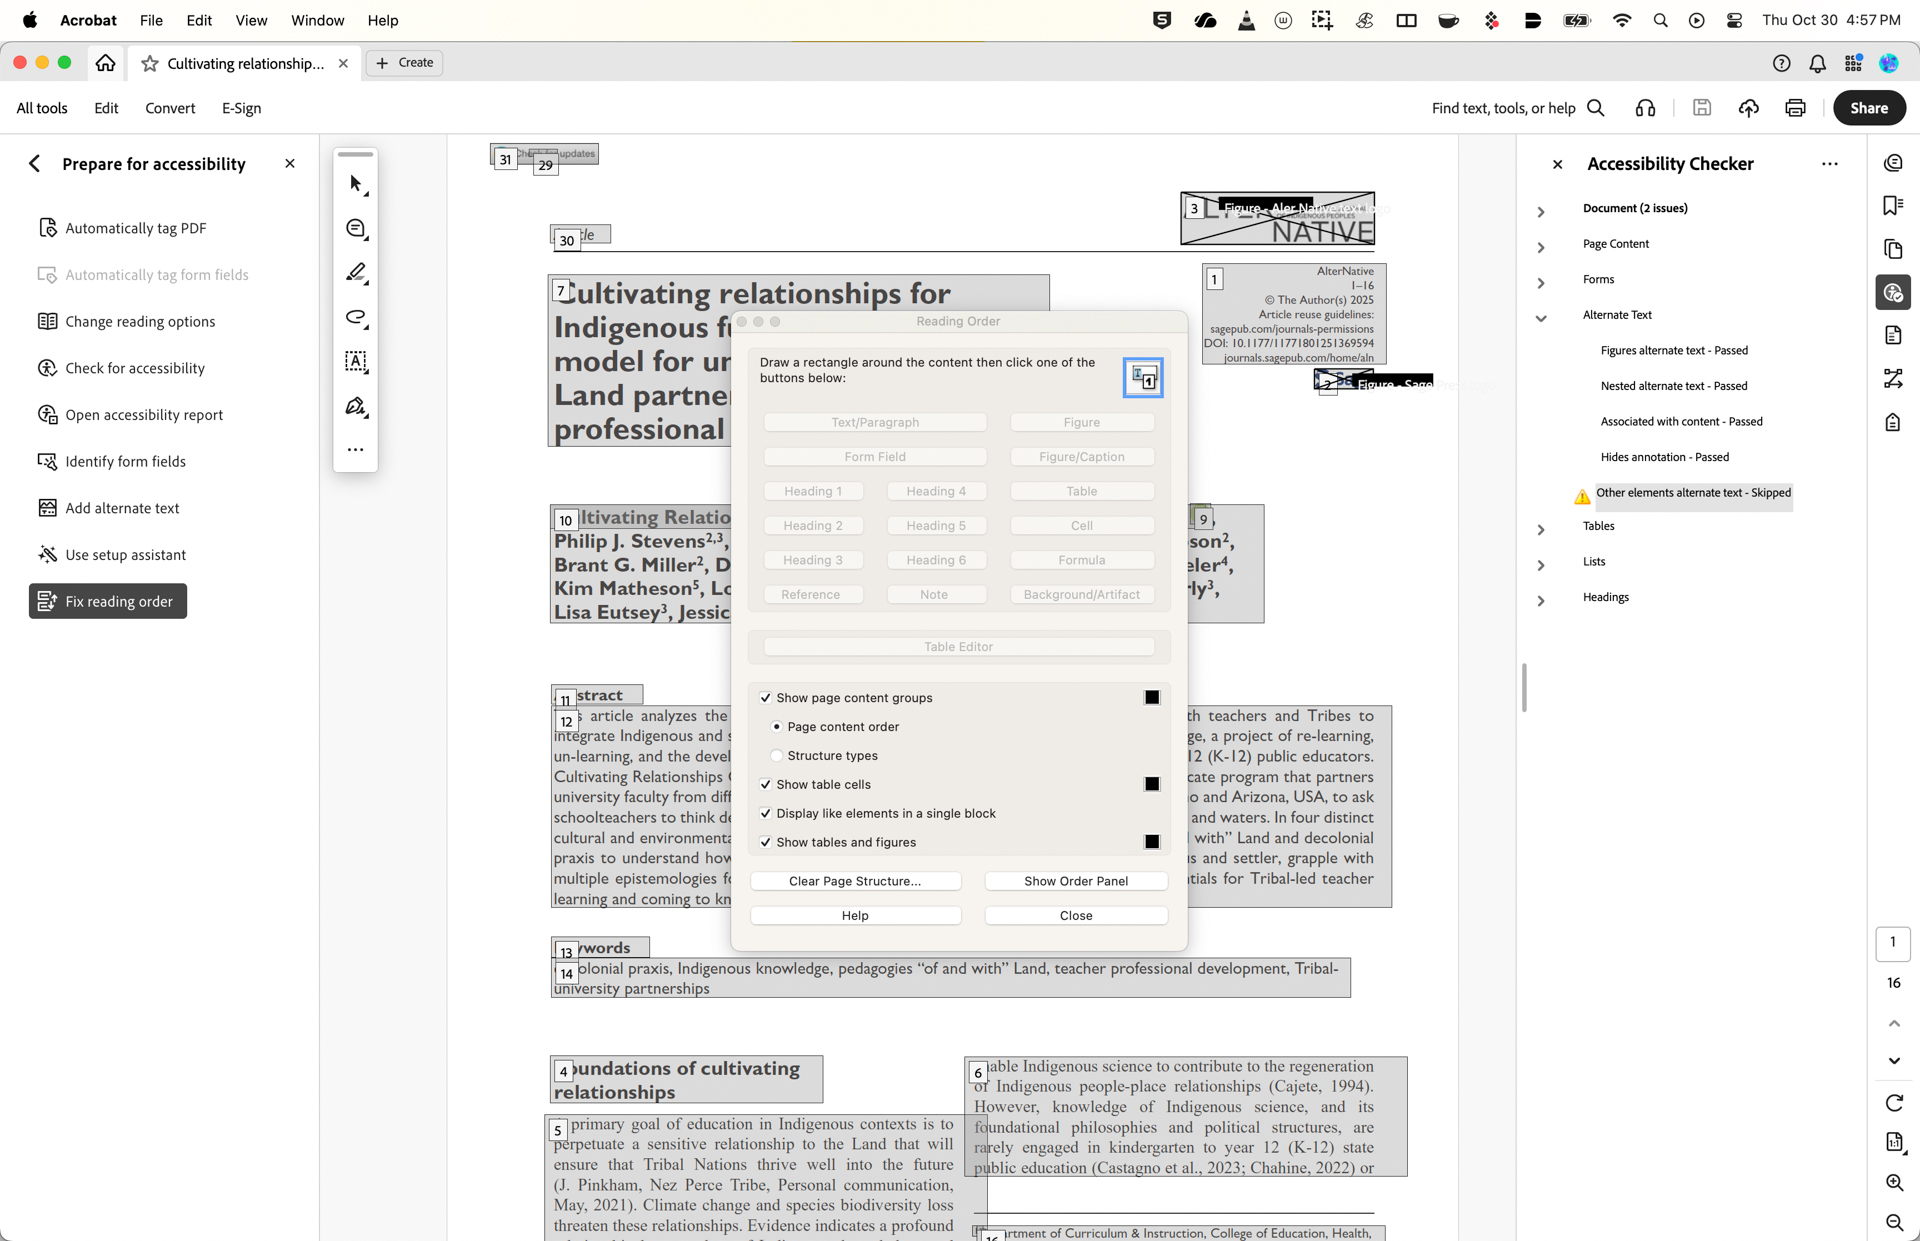
- If everything needs correcting, select
Clear Page Structure. Then draw boxes around each page element in the order they need to be read, selecting what text type they are (Header 1, Header 2, Body Text, etc.) as you order elements.
Set the Document Language
Without a language set, a screen reader cannot pronounce words correctly.
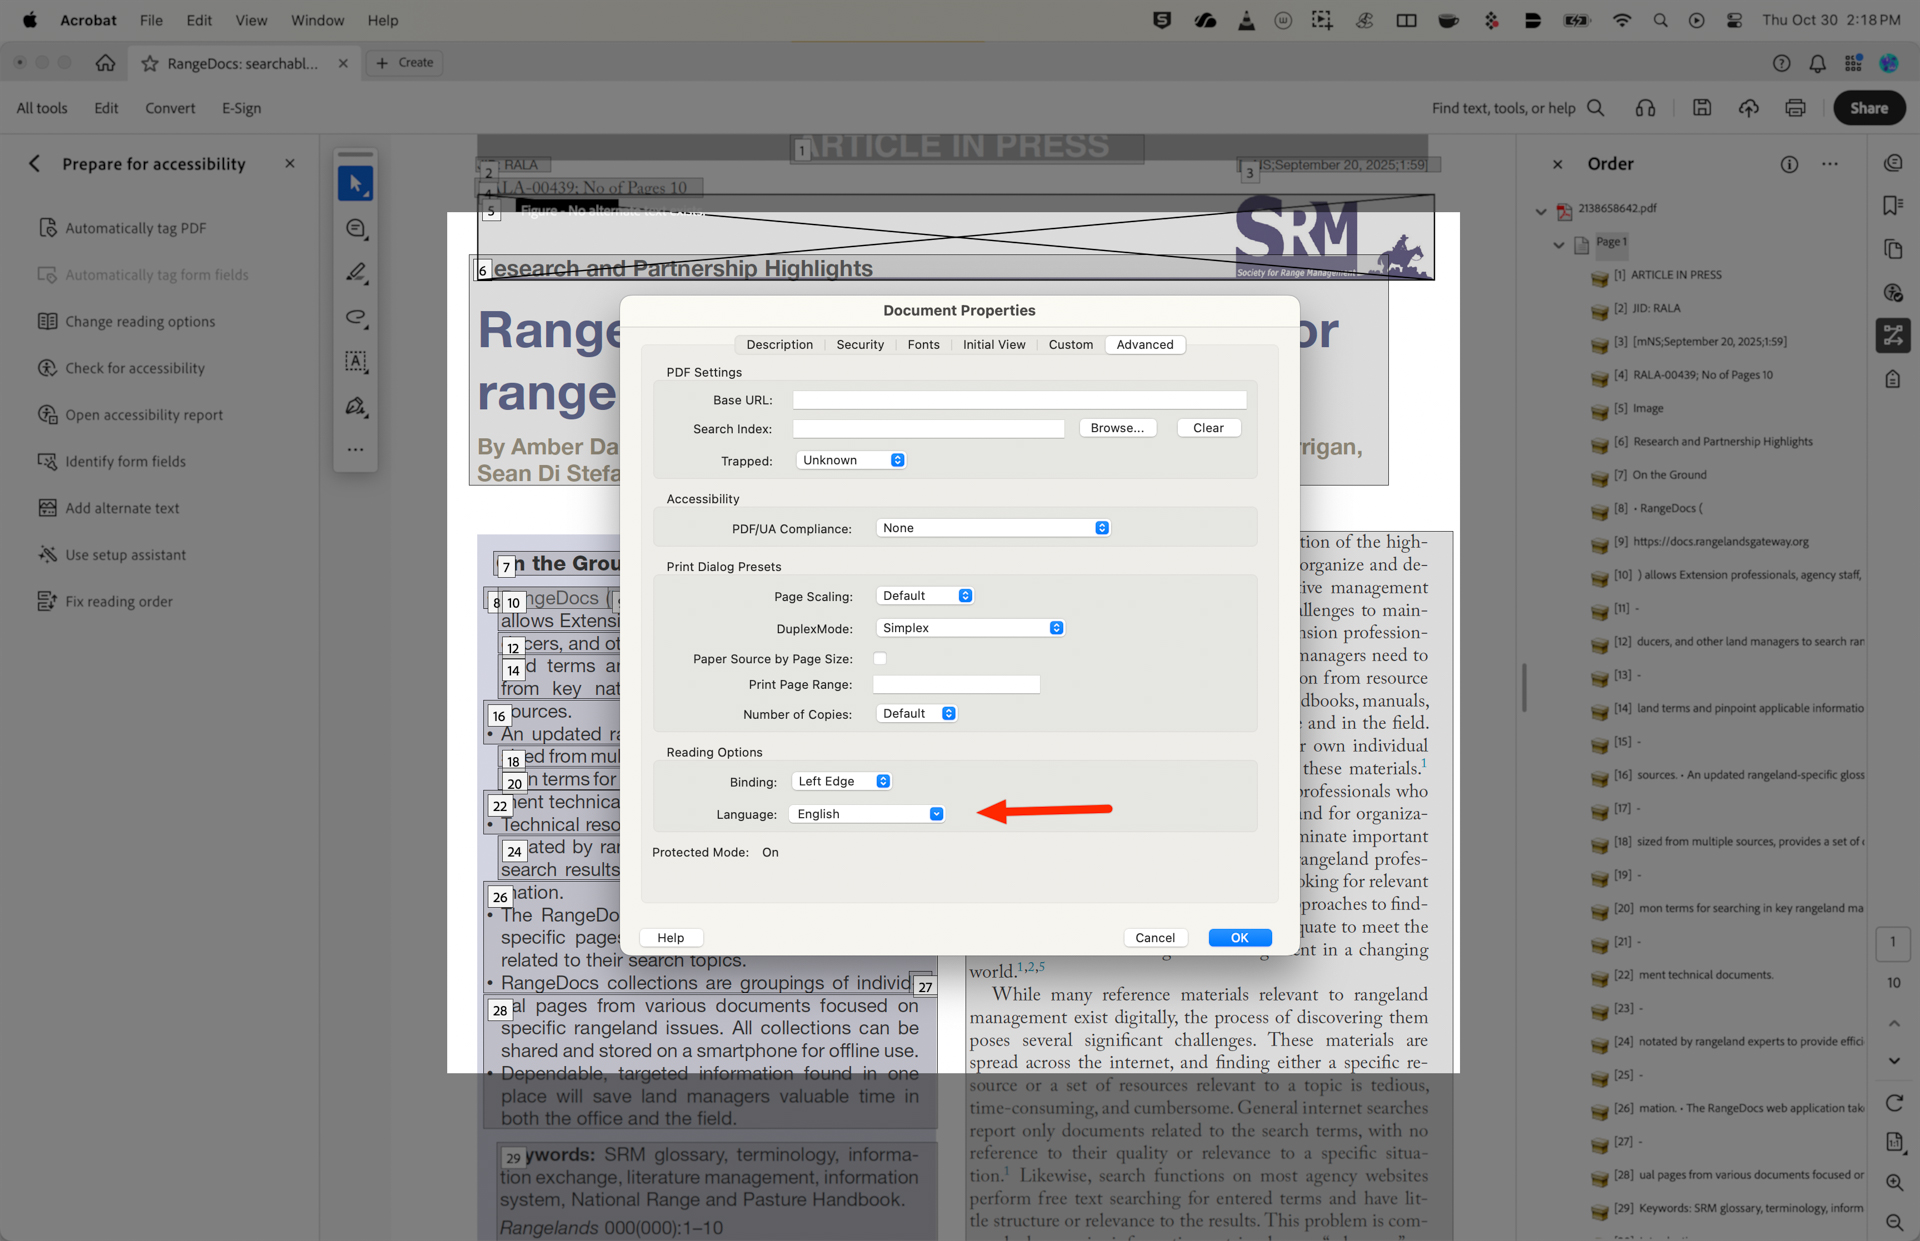
- Go to
File>Document Properties - Select the
Advancedtab - Under the
Reading Optionssection, select the correct language from the Language dropdown menu (e.g., “English (US)”) - Click
OKto save
Set the Document Title
Screen readers should announce a document’s title, not its filename.
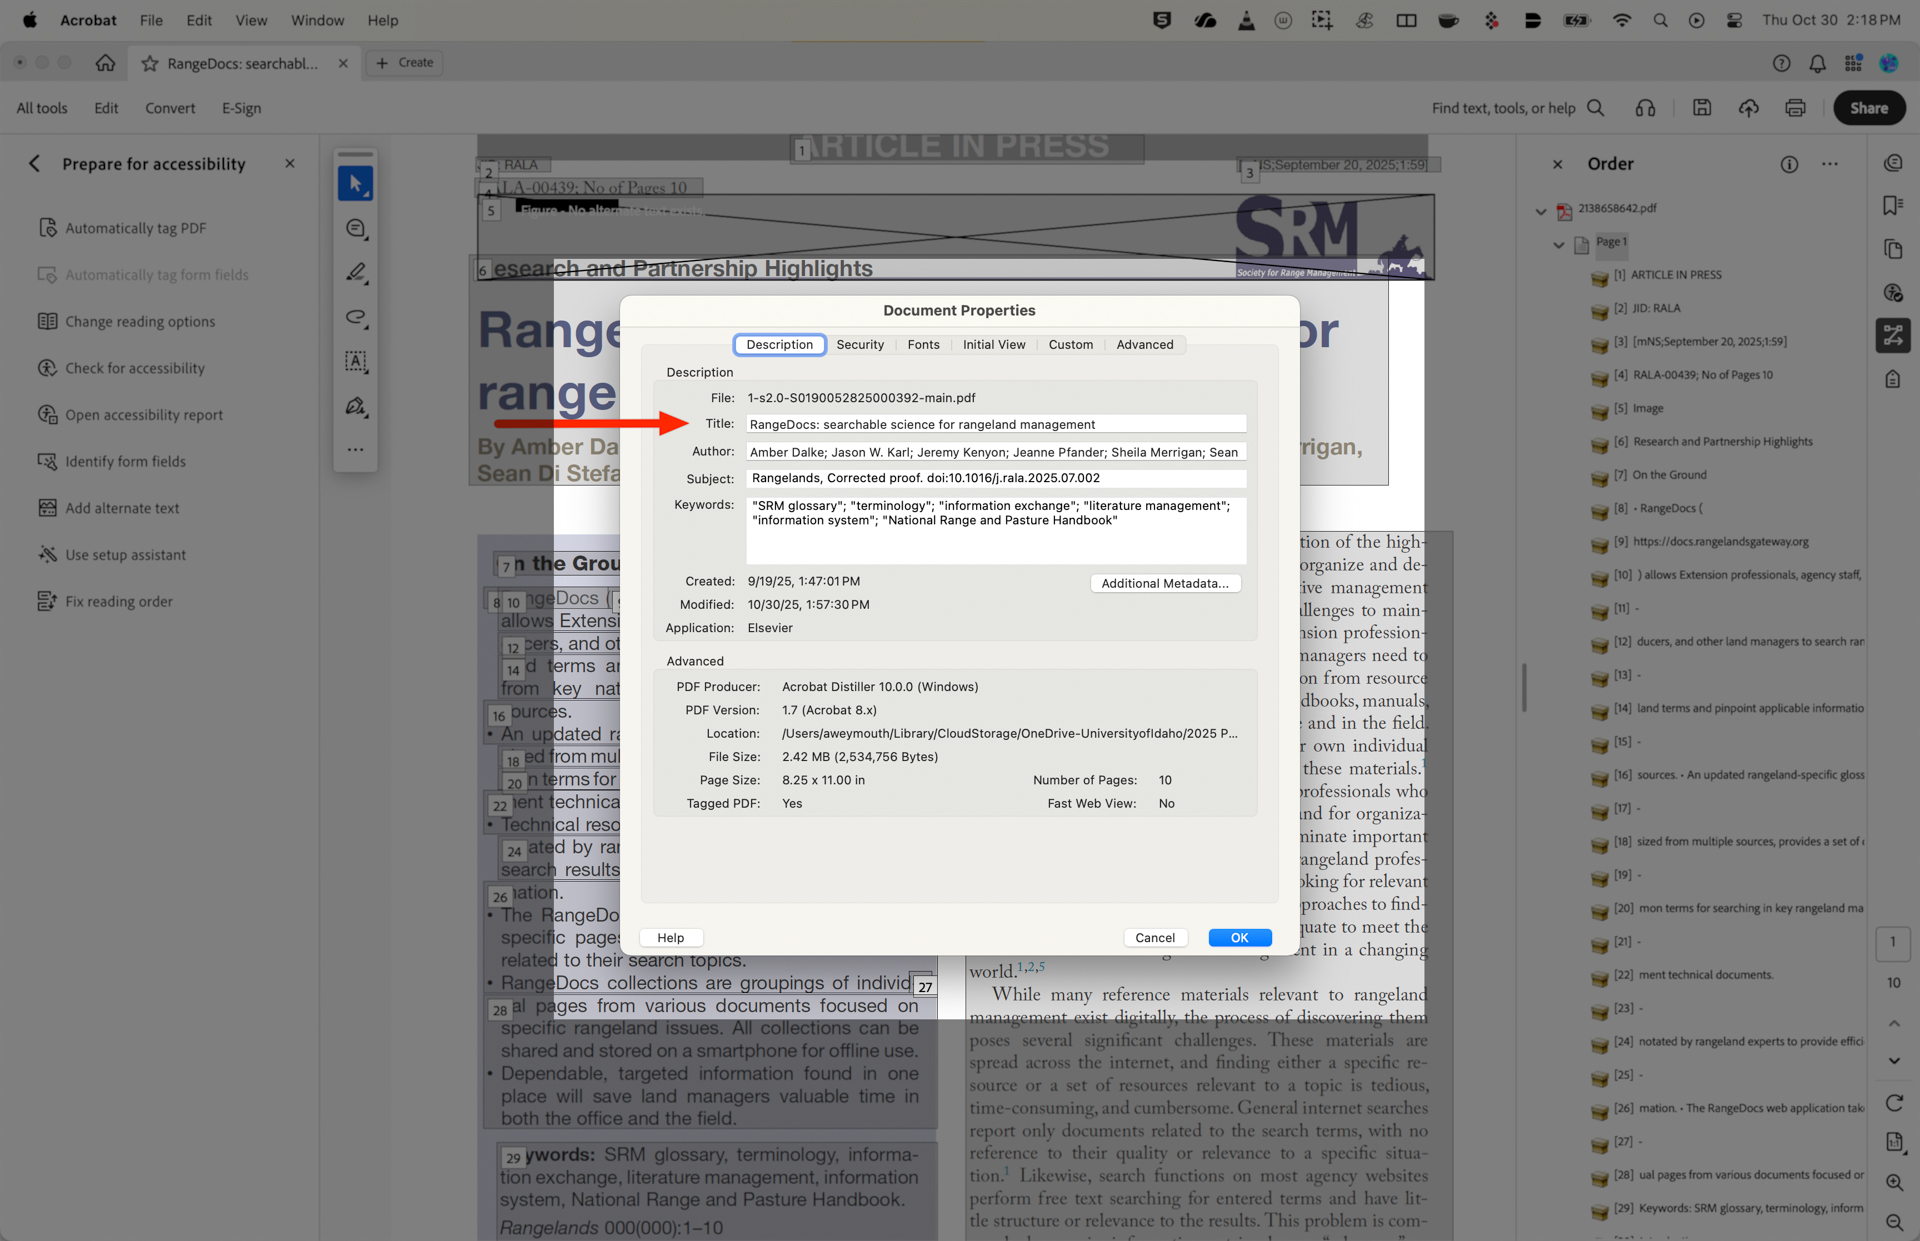
- Go to
File>Properties. - Select the
Descriptiontab. - Enter a descriptive title in the Title field if this is missing.
- Click
OK
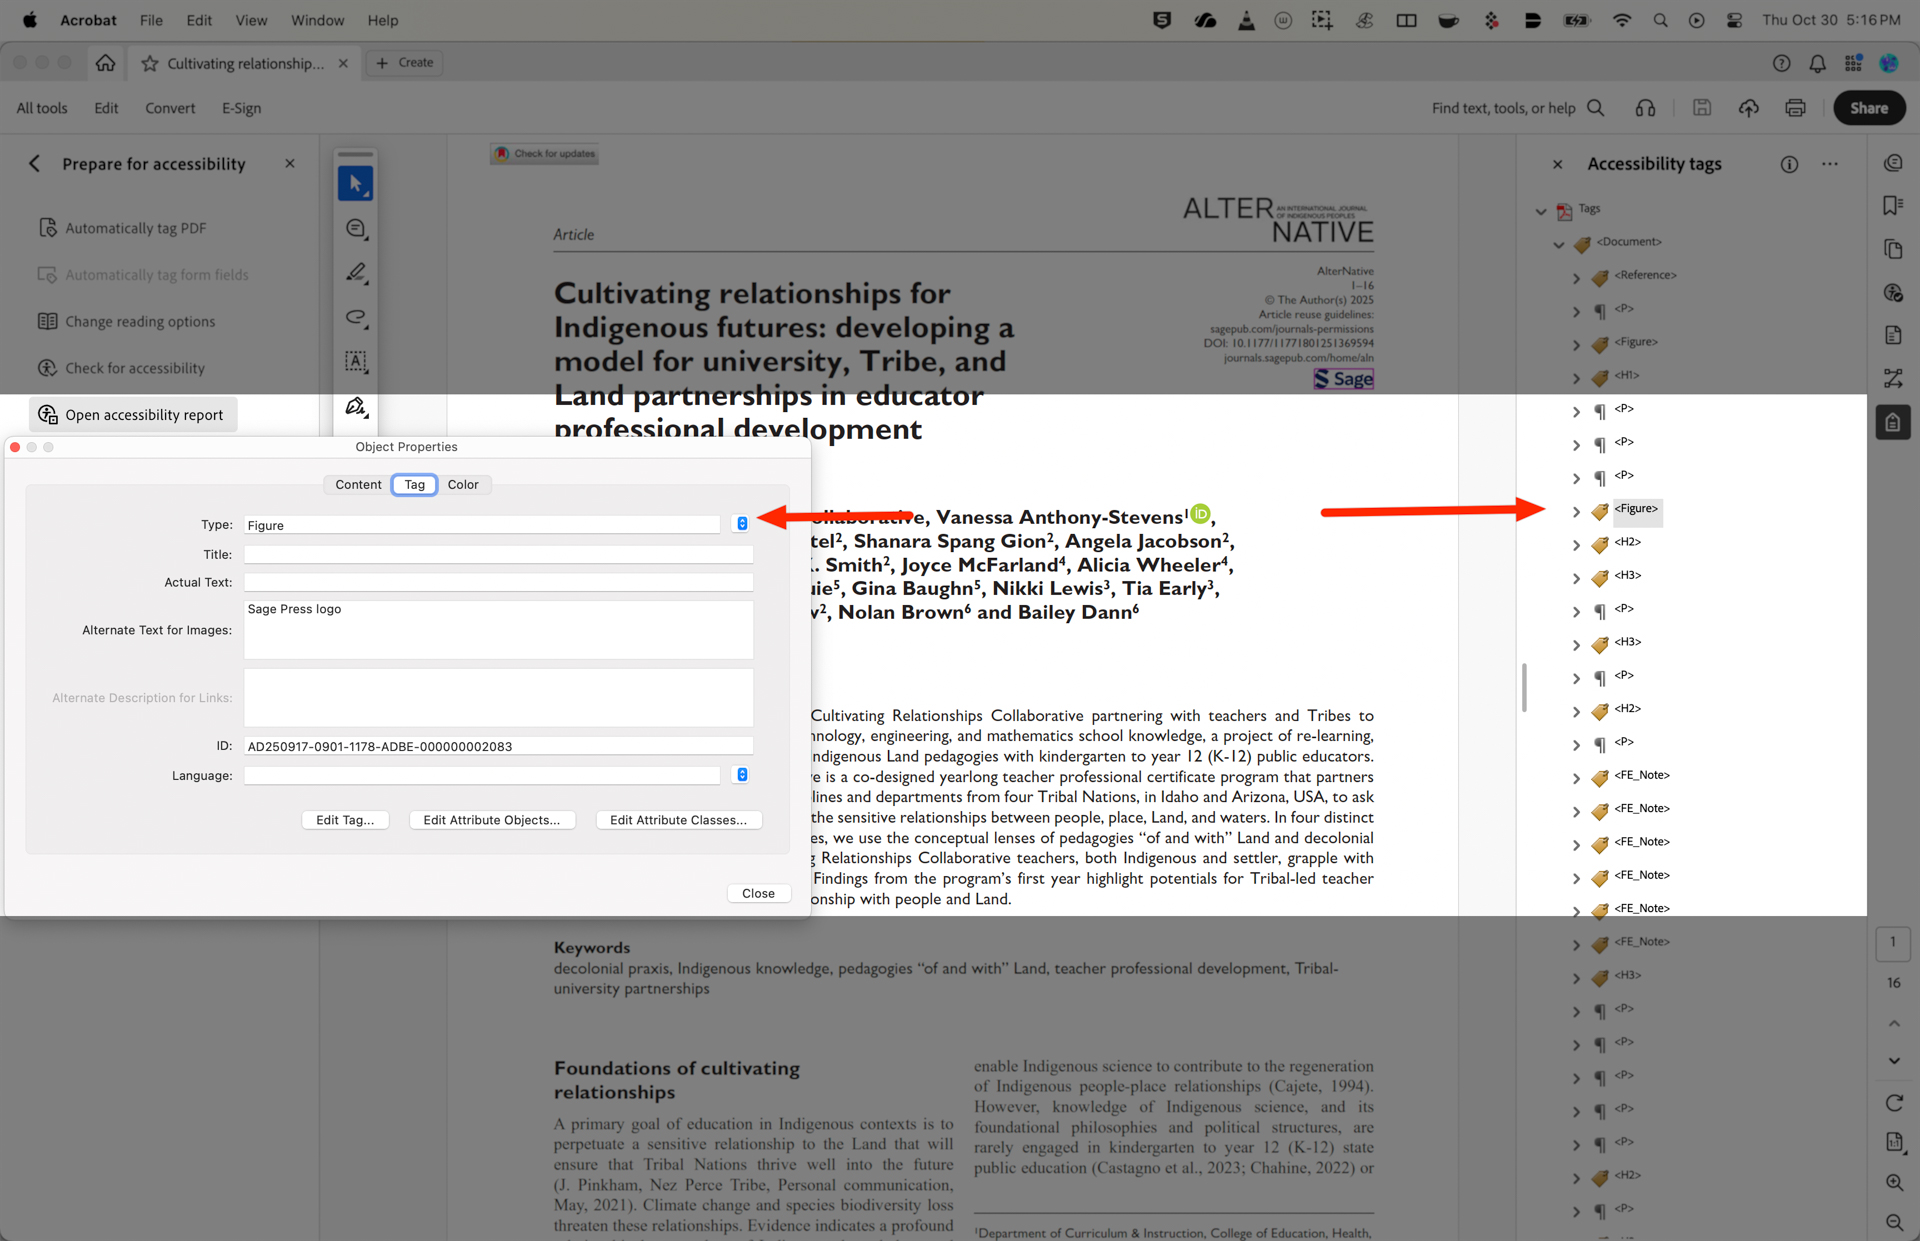
Decorative Text vs. Alt Text
Images must have alternative text that describes their content for screen reader users. “Figures” in a document can also be identified as decorative text.

Ask these questions to determine if a figure is decorative text:
- Is the image purely for visual styling? (e.g., a border, a background texture, a corner flourish)
- Does it not contain any text or critical information?
- If you removed the image, would the user lose any understanding of the content on the page?
- Is it not a link or a button? (If it’s clickable, it’s functional, not decorative)
Add Alt Text
- First, select
Add Alternate Textfrom thePrepare for Accessibilitypane on the left. This will open a window that will allow you to add alt text to only the areas that have been identified by the Auto Tag process.
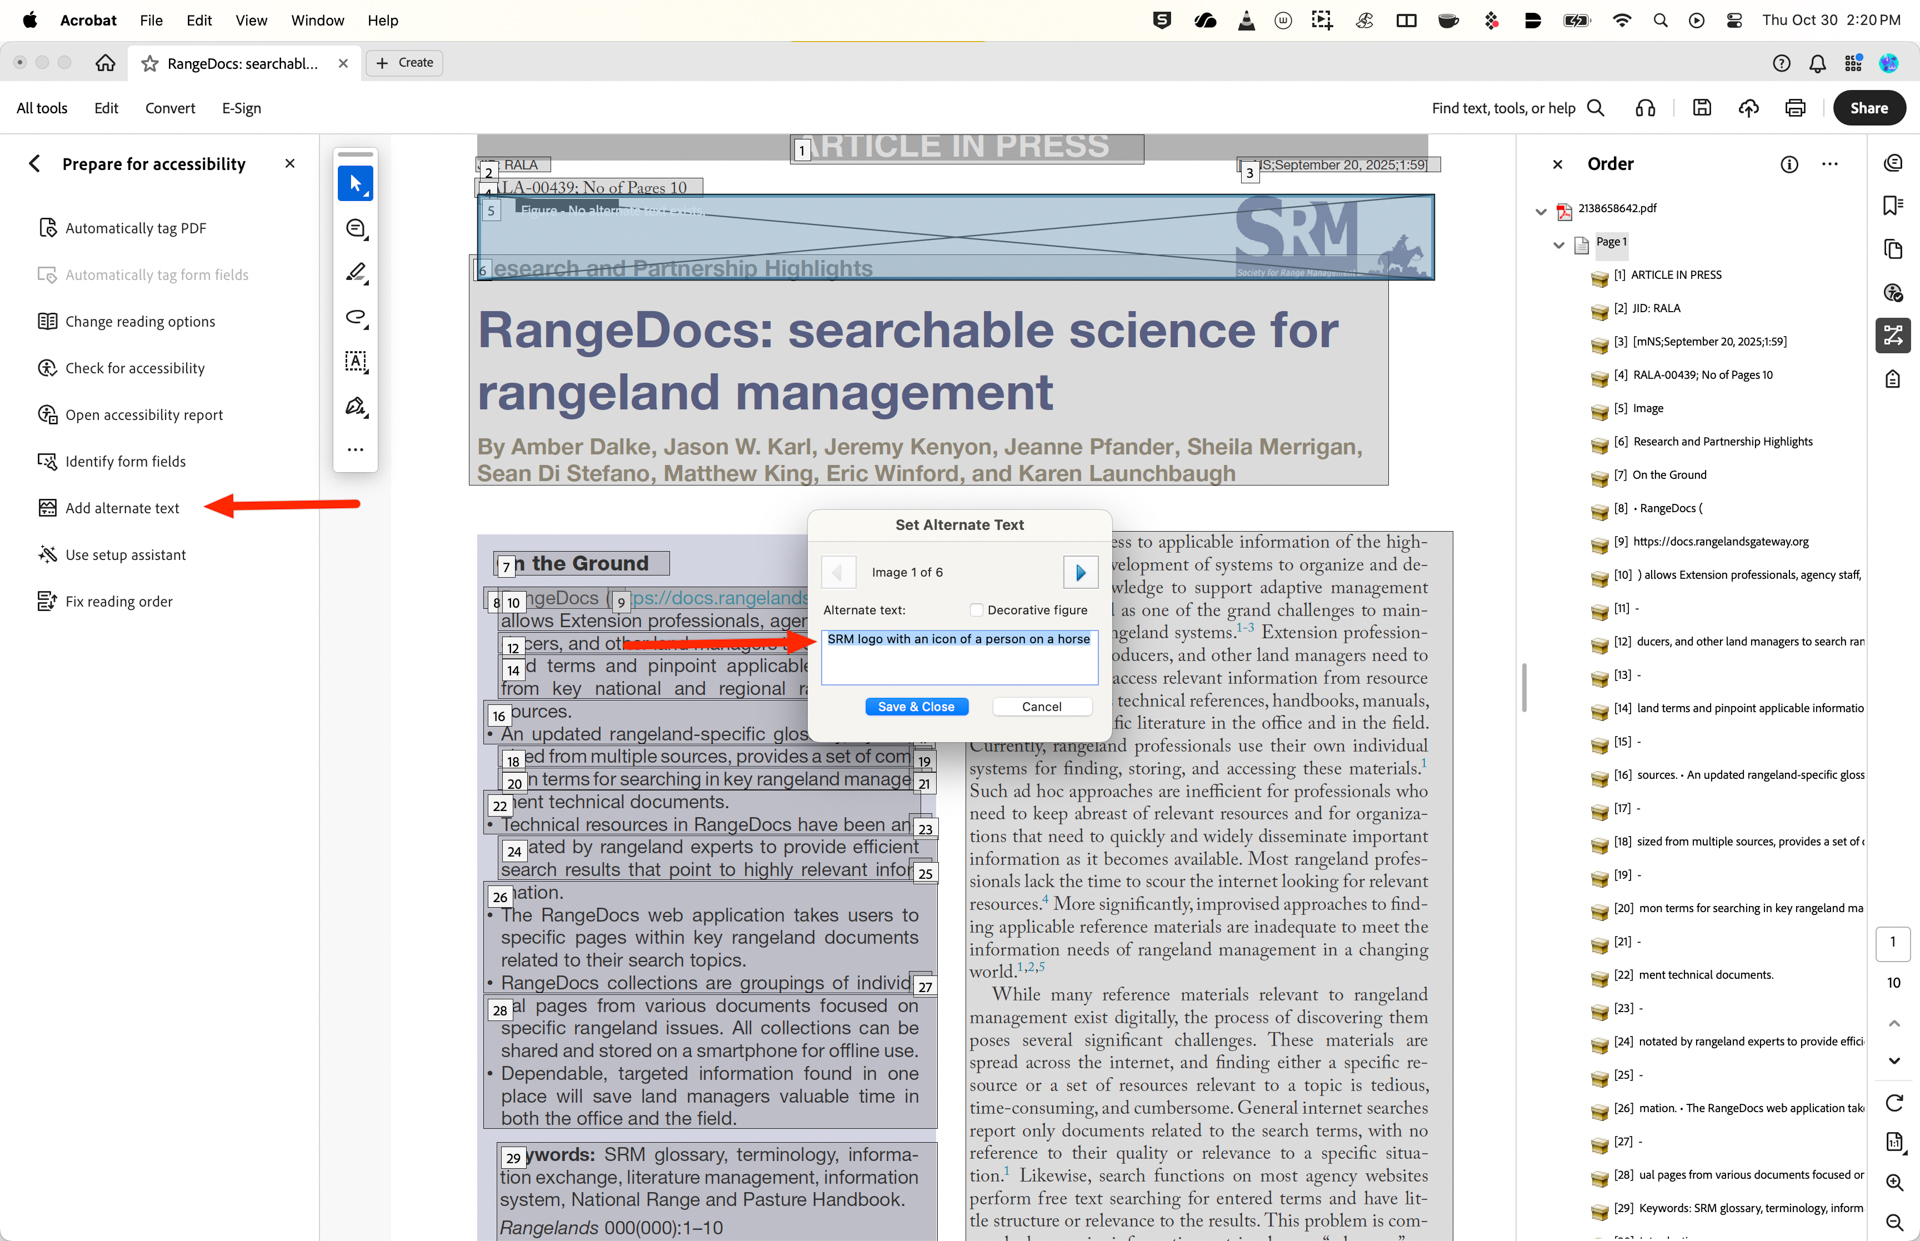
- If the image has been identified correctly, describe it simply in one or two sentences, being sure to add any words that may be incorporated in the image.
- If the element is a decorative image, mark this box instead of adding alt text. This designation will add code so the element is skipped over by the screen reader
- If an element has been identified as a feature incorrectly, open the accessibility tags section on the right pane, find that section, right click and select
Propertiesfrom the bottom of the window. Select the dropdown next to the Type section and find the appropriate type and close the panel to save.
- Alternately, the Auto Tag function might identify a little bit of noise or distortion on the page as a figure. If this is the case, go to the Tag panel, select this item from the list, right click and select
Delete Tag.

Next, let’s check lists, tables and hyperlinks:
Check Lists:
- Find the list content in the Tags panel. It should be tagged as
<L>(List), with<LI>(List Item) tags inside. - If it’s not tagged correctly, select the list content on the page with the Selection tool.
- Right-click the tag where you want the list to go in the Tags panel and select Create Tag from Selection. Choose
<L>as the tag type.
Check Tables:
- Find the table in the Tags panel. It should be tagged as
<Table>, with<TR>(Table Row),<TH>(Header Cell), and<TD>(Data Cell) tags inside. - The most critical part is identifying header cells. Right-click a cell tag (
<TD>) and select Properties. Go to the Table Header tab and choose if it is a row or column header. This changes the tag to<TH>. - If a table is not tagged at all, use the
Fix Reading Ordertool to draw a box around the table and select “Table” from the dialog. Then, go into the Tags panel to define the headers as described above.
Check Hyperlinks
Links need to be descriptive. A link that reads “Click Here” is not accessible.
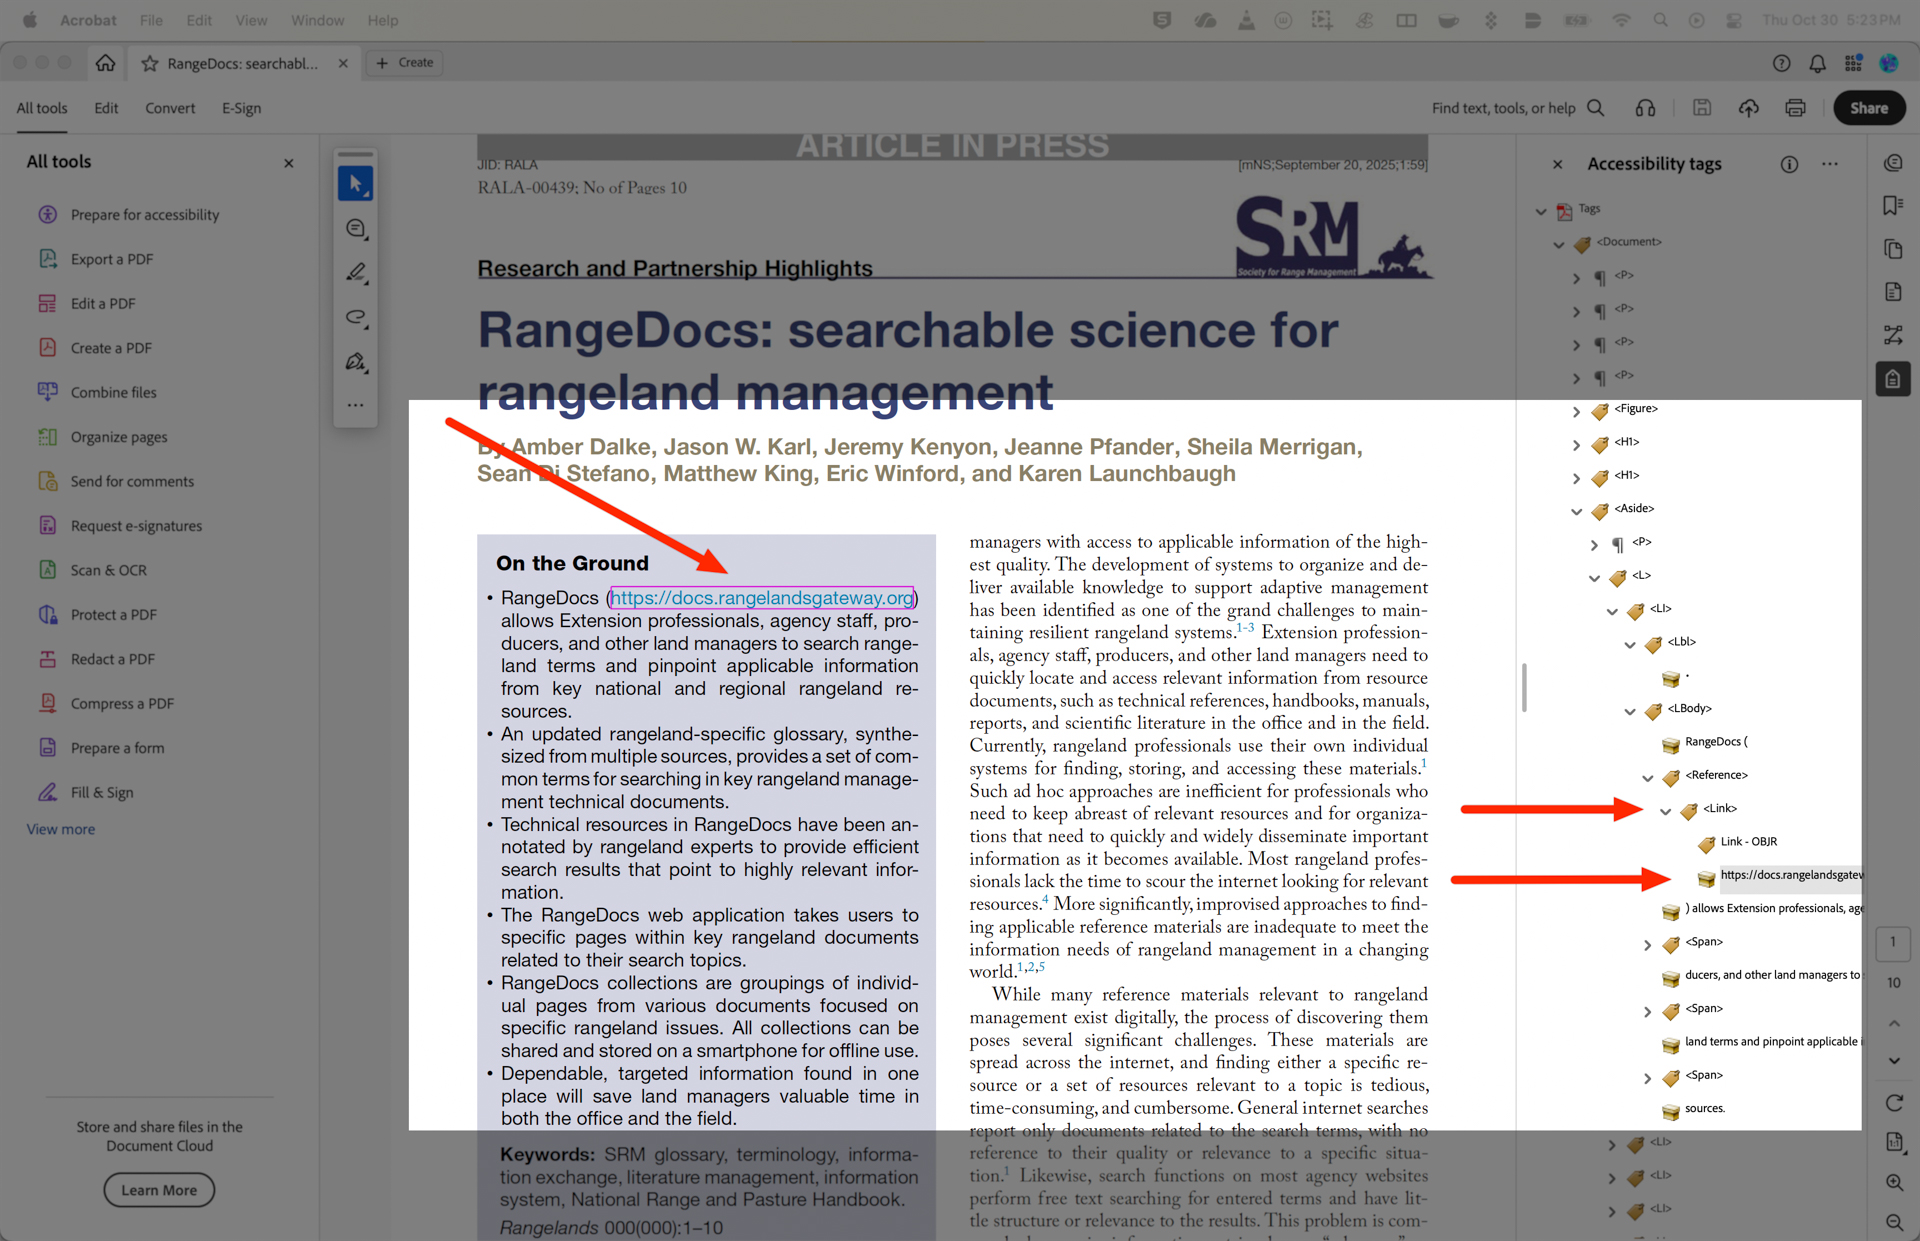
- In the Tags panel, find a
<Link>tag. - The text inside the
<Link>tag should be descriptive (e.g., “DOJ Final Rule on ADA Accessibility”).
Note: There is a little discrepancy here on what is recommended remediation and best practice. Recommended remediation is that, if the linked text is not descriptive, you actually use the Edit Text and Images function to visibly change the text in the document. I don’t think we want to be taking this liberty with faculty PDF files. Just changing the descriptions within the link tags seems sufficient.
Verify Header Order is Sequential
- Return to the Accessibility Tags pane on the right and look over header material. Make sure Headers are stepping down sequentially (<H1>, <H2>, <H3>, etc.) and not skipping a number.
When in doubt, just designate an element as a paragraph rather than using elaborate header structures.
Final Verification and Saving
Once you believe you have fixed all the issues, you must verify your work and save the file correctly.
Run the Accessibility Check Again
- Go back to the
Check for Accessibilityfunction and run the tool - If anything still comes up, expand the issue and it will make all of the culprits visible
- Depending on the issue, you may see the option to fix the item if it is a metadata correction that can be done automatically
- If not, right click and select see in accessibility tags to resolve the individual issue
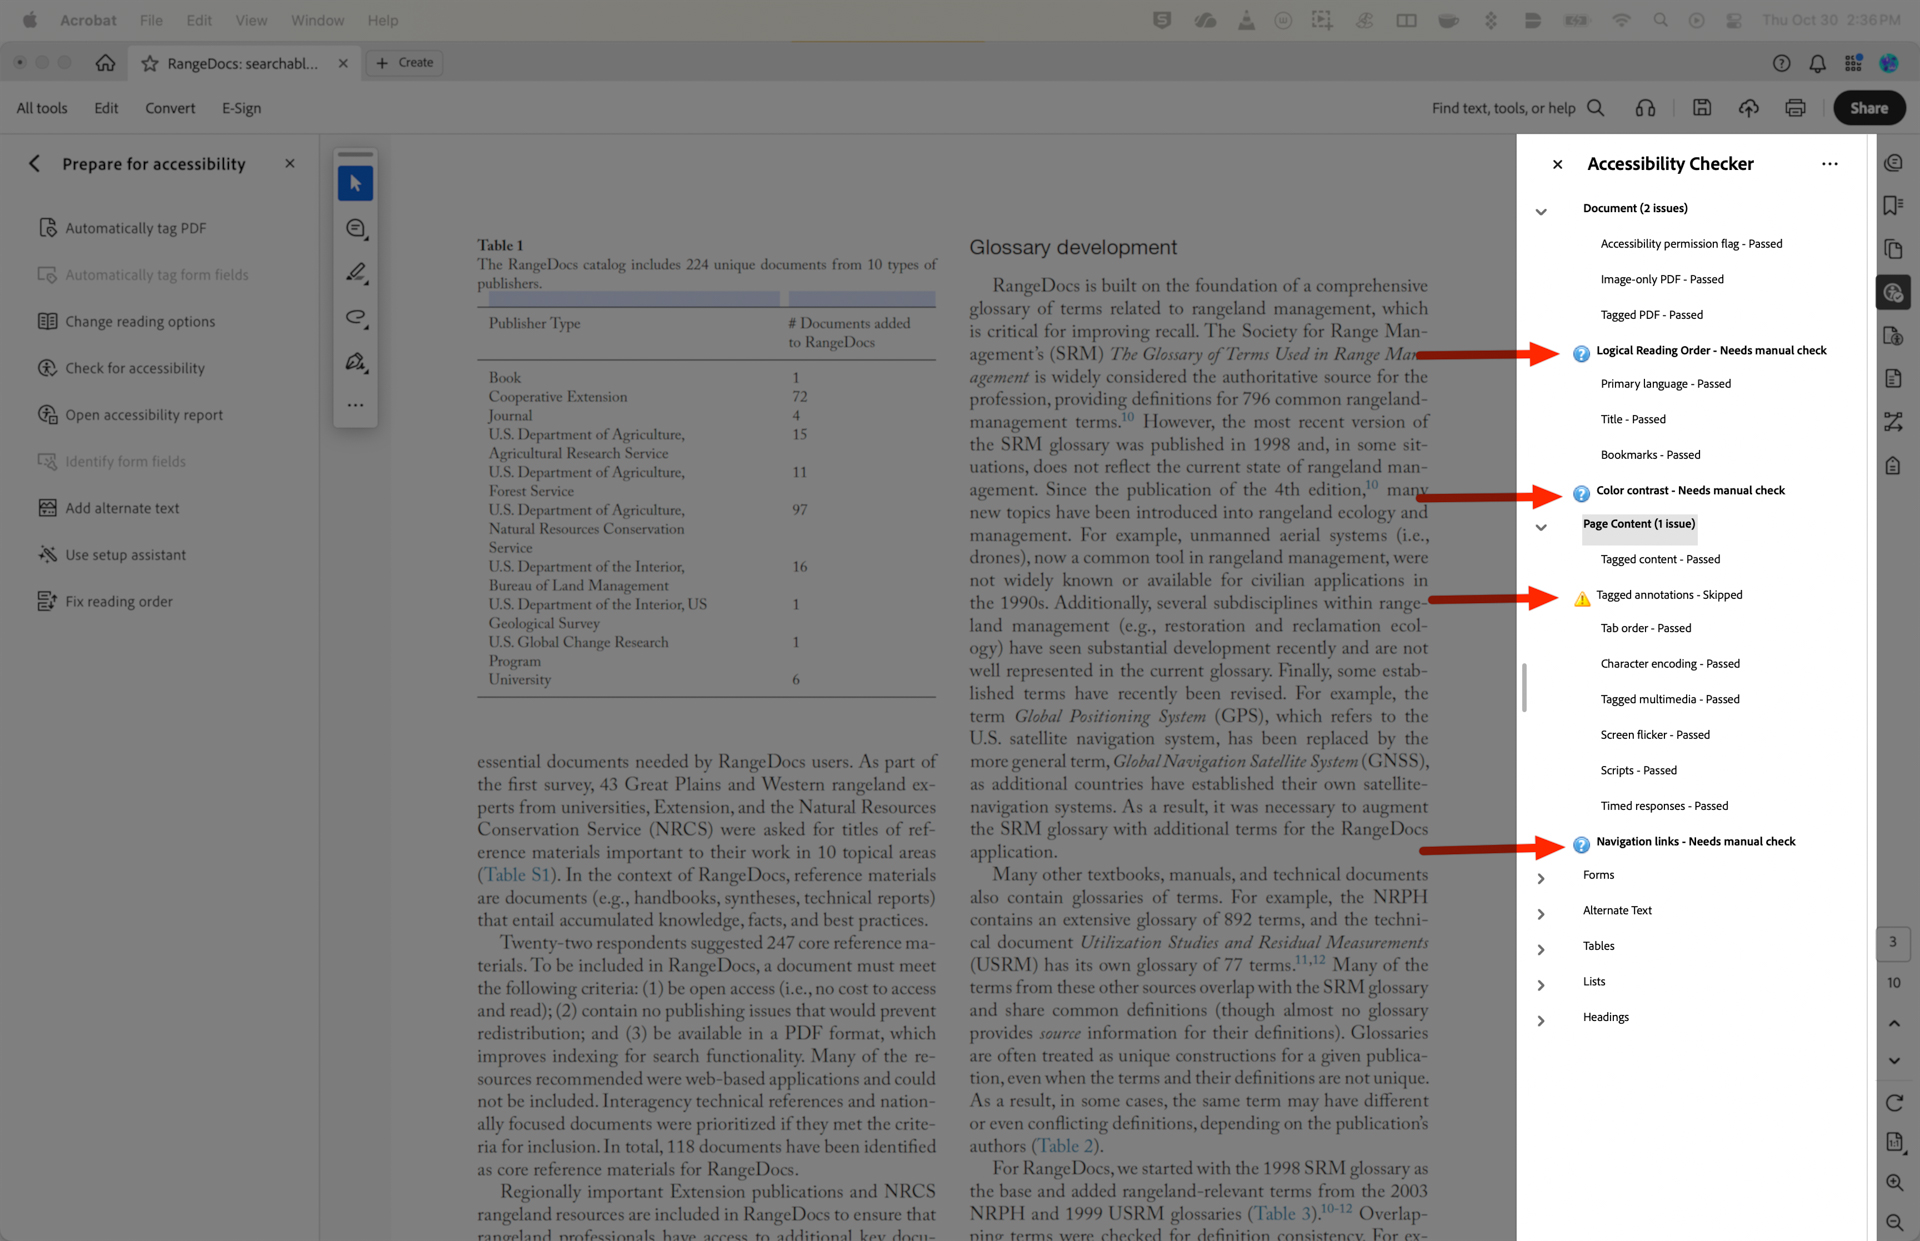
- Note: Some of the final elements that are flagged are “issues” not failures. This is an odd feature of Acrobat where some items that are nonessential need to be skipped rather than these items not being flagged in the first place. Additionally, there are items that will be flagged as “needing a manual check” that are also nonessential.
- Repeat as needed!
Save the File
How you save is important to preserve your accessibility work.
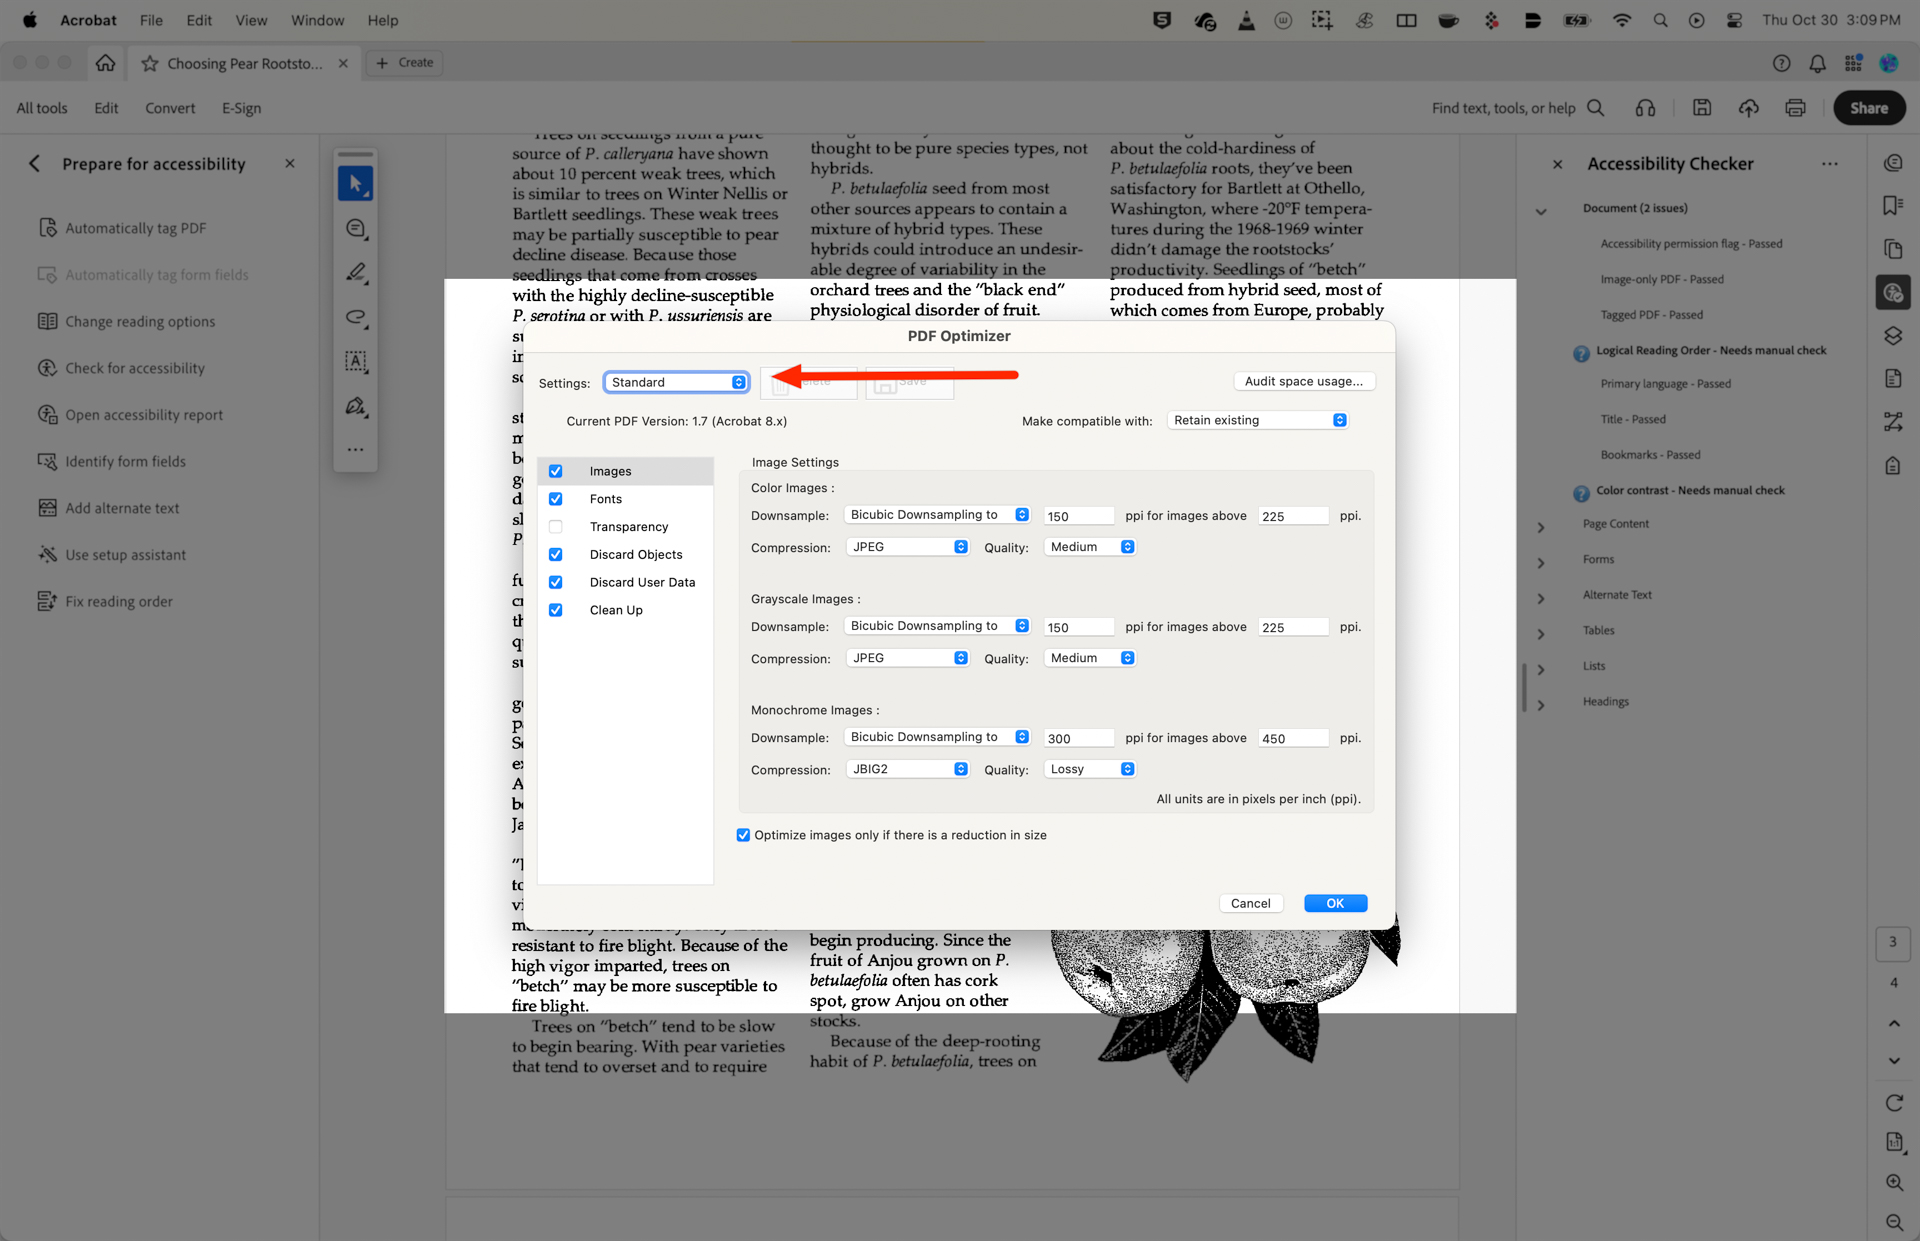
- Go to
File>Save As Other>Optimized PDF, making sure the settings are on standard (should be default) - Click OK
       ________
     /         \
    |    PDF    |
    |   -----   |
    |  ( •‿• )  |
    |    | |    |
     \_________/
        /   \
       /_____\
        |   |
       (b) (b)
That's it! Enjoy your accessible PDF file!